Audio & Video Recordings
Contact Us
Email: onlineeducation@deanza.eduPhone: 408.864.8969Hours of Operation: Monday – Friday: 8:00 am - 4:00 pm
Closed Captioning & 3C Media
 California Community Colleges system funds 3C Media Solutions a technology service that provides faculty, staff, and administrations resources
to store, share, and distribute educational media to students and each other. Services include:
California Community Colleges system funds 3C Media Solutions a technology service that provides faculty, staff, and administrations resources
to store, share, and distribute educational media to students and each other. Services include:
- personal account for uploading and storing media
- ability to share media privately or publicly (embed, email link, or post to the 3C site)
- option to create a 'group' for joint access
- request captioning for your media in a few short, simple steps
Create An Account
- Register with 3C Media Account
- Use your faculty/district email
- Check your faculty/district email for a reply from 3C Media to complete your account registration
- If you do not receive an email within a day or two, contact 3C Media support for setup assistance.
Submit Captioning Request
- Log into your 3C Media account
- Upload your media to your 3C Media Account
- Select "Media" menu
- Select the “Upload a video to 3C Media Solutions” radio button.
- Submit Video for Captioning
- Locate and select the video title you wish to submit for captioning from your Media page.
- Select the “Submit this Media for Captioning” link from the "Tools" options.
- Provide the length of video in minutes (round up to the next whole minute).
- Enter the appropriate Section#, CRN, or Ticket from the course this media will supplement, for example, “MUS 100.”
- From the dropdown menu, select the applicable term.
- Select the “Submit” button.
- Review the "How to Guides" for 3C Media
Record at Home or Office
To set up your home recording studio, you will need easy to use software record on your desktop or laptop computer. Select the components that best matches your recording features and budget, either Mac or PC.

Camera and Microphone Options
- Laptop with built-in camera and microphone (Lowest cost and average quality).
- USB webcam camera ($50) with webcam microphone or external mic
- Logitech C920 HD Pro WebCam with built-in microphone, cost $50
- Blue Yeti, USB Microphone, gain control, mute button, Mac or PC, Includes stand, cost $125
Recording Software
Screen Pal Watch a Demo Video or Tutorial
- Screen/video/audio MP4 recording, pause and resume during a recording session
- Web Cam video window (picture in picture) or full screen
- Trim beginning and end of recordings or use built-in Video Editor Suite
- Cursor Halo
- Zoom in/out and highlight areas of your video
- Record the whole computer screen or just a part of the screen
- ScreenPal Teacher Pricing Options
- Free trial version has watermark, 15 minute record limit, no video editor and other restrictions.
Record with a Smartphone
Recommended Smartphone Accessories
- Shure MOTIV MV88 Digital Stereo Condenser Microphone for iPhone - $149
- Joby GripTight GorillaPod Action Stand with Mount for Smartphones Kit - $37
- Manfrotto Stand for Universal Cell Phone, Short Tripod or Stand - $29
Set Up Online Teaching Space
Copyright and Fair Use
When using video materials in the classroom, always be attentive to copyright and "fair use" issues. Visit the U.S. Copyright Office website and look for their Fair Use Index.
Video Webcam Options
A Webcam offers improved video clarity, sound and colors compared to some a built-in laptop cameras. It is recommended to use Video Capture Resolution of 1080p or up.
- Logitech C920 HD Pro Webcam
- Logitech C270
- Razer Kiyo Streaming Webcam
- Logitech BRIO
Audio Voice Recording Options
It is recommended that you are in a quiet room or your home office to record with the microphone on your laptop or use a pair of earbuds or headphones that are equipped with a mic. Another option is a dedicated microphone to capture your voice as you record and reduce unwanted background noise.
- Headset with built-in microphone: Logitech USB Headset
- Microphone only: Blue Yeti USB Microphone
- Headphones only: AKG Pro Audio K72 Over-Ear, Closed-Back, Studio Headphones
Body Position is Important
Position yourself so that you can be seen from the shoulders to the head, or from the waist to the head. Anything closer may be overwhelming; anything further might make your face too hard to see.
It is important that your webcam be at eye level. You can have a separate camera or you can raise the laptop. If you're using a separate camera, it should be as close to your screen as possible. Looking at the camera when you're talking makes the experience "human" as if you are looking directly at the students.
Room Lighting Options
You should be facing the window or source of light so that there isn't glare on your screen. To reduce eyestrain set up sufficient lighting in your workspace. Choosing a sunny spot near a window helps. You may need to add additional lighting if you are using overhead lighting, consider a floor lamp or table lamp to create a well-lit space. A ring light provides even lighting with the webcam positioned in the center. Panel Lights attached to tripods can be positioned around the room to allow greater flexibility.
- UBeeasize Mini 10" Selfie Ring Light with Tripod Stand & Cell Phone Holder
- Photography Photo Table Top Studio Lighting Kit (2 lights)
- Advanced: GVM 800D-RGB LED Studio 2-Video Light Kit
Background Options
Your background should not be too distracting, you want students to focus on you, not on what's behind you. A plain wall is a good backdrop. Hanging a backdrop may include additional cost. Average size is 10x12' backdrop. Or use the Virtual background option in Zoom!
View the recommended equipment and browsers for Zoom.
Internet Connection Recommendations
Internet speed is not only based on internet connection plan, but other factors such as how many other people are using the internet in your household, region, or nation. To figure your base internet speed follow the instructions below.
- Open any browser page (such as Chrome) and go to the SpeedTest Website
- Press the GO button. Speedtest will Test your Download and Upload speeds. Write the results down along with the date and time of the test.
- Sending or receiving video, especially live video from Zoom, takes up a lot of bandwidth. Even though these programs are designed to work with consumer-level bandwidth, some find that choppy video and audio, dropped calls, and very slow file upload times are directly connected to low-bandwidth issues.
|
Upload Speed |
Download Speed |
Results |
|---|---|---|
|
1 mbps |
3 mbps |
Choppy video, audio or a dropped call |
|
3 mbps |
5 mbps |
Adequate Speed |
|
5 mbps |
10 mbps or higher |
Great Speed |
Tips for Internet Interruptions
A slow computer could cause choppy video/audio and dropped calls.
• Plug your computer directly into the modem using an Ethernet cable instead of Wi-Fi.
• Limit the number of simultaneous users on your internet connection.
• Upgrade your internet connection speed.
How to use a Smartphone or Tablet as a Second Camera with Zoom
Zoom allows for iOS screen sharing from iPhone and iPad, using the Zoom desktop client. You can share your iPhone or iPad wirelessly utilizing iOS Screen Mirroring, or you can connect your iOS device to your Mac computer with a cable to share.
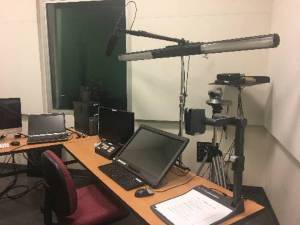
Faculty Self-Record Studio
The "Faculty Self-Record Studio" offers high quality recordings using a overhead hands free microphone, PC computer, PC or Mac laptop connections, a document camera and pan/tilt video camera. It only takes a few steps to get started recording engaging instructional content. Contact the Online Learning Center for an appointment.
- Insert a Flash drive into the record hub.
- Press the power ON button on the control panel (similar to classroom control panel)
- Select a camera background image using the camera background computer.
- Select the first device to be recorded (PC, Laptop or Document Camera).
- Press the Start Record button.
View the complete Self-Recording Studio Step by Step User Guide.
We offer a short personal orientation on your first scheduled reservation.

Self-Record Studio Key features:
- Camera: Select camera full screen, picture-in-picture camera box or do not use any camera image.
- Timer: The timer displays the current length of your recording and resets when you stop recording.
- Picture-in-Picture: Turn the P-in-P box ON/OFF or select P-in-P position, top/right or bottom/right.
- Lights: The lights turn ON and OFF when you press the power ON/OFF buttons.
- Annotation User Display: This display shows the current selected device without any camera images. Annotation over your instructional content. Note: Annotation feature only works with built-in PC.
- Record Display: This shows the final record image.
- Camera Control buttons: Press HOME button to move camera to default position. Use other camera movement buttons to fine tune your camera shot.
- Laptop Connection Cables: Connect your Mac or PC laptop VGA or HDMI ports. Remotely control your laptop keyboard and mouse will master keyboard/mouse.
Trim, Split and Merge your Recordings
- Trim means to remove the head and/or the tail of the clip
- Split or Cut means to cut the video clip into sections.
- Merge or Splice together means to join two video clips together
Edit Software Recommendation (Mac or PC)
- Apple's Quicktime software edit features
- ScreenPal built-in editing features
How to Edit with Quicktime
View the Quicktime User Guides for instructions to trim, edit or rearrange video clips.
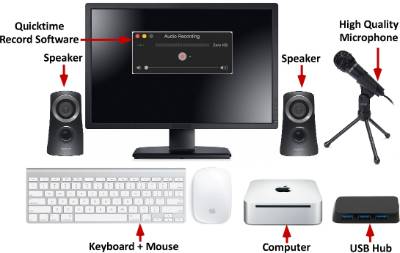
Audio Only Record Cart
Need to record high quality voice or sound effects? On our Audio Record Cart we use a professional microphone, a digital audio encoder and Quicktime record software to produce high quality m4a audio files. To reduce outside noise interference the audio record cart is located in our recording sound stage. We offer a short personal orientation on your first scheduled reservation.
View the Step by Step Audio Record Cart User Guide.